本篇文章采用<script setup>setup语法糖这种组合式API与TypeScript写法来讲述vue3到底有哪些常用且必须掌握的组件通讯的方式?前面讲述了vue2的组件通讯的方式。vue2与vue3类似,掌握vue2的基础上学习vue3也是十分简单。
props
父传子vue3中使用props也不例外,上代码!
1
2
3
4
5
6
7
8
9
10
11
12
13
14
15
16
17
18
19
20
21
22
23
24
25
26
27
28
29
30
31
32
33
34
35
|
<template>
<div>
<Child :name="name" />
</div>
</template>
<script setup lang="ts">
import { ref } from "vue";
import Child from "./views/Child/index.vue";
const name = ref("刘德华");
</script>
<template>
<div>
{{ name }}
</div>
</template>
<script setup lang="ts">
const props = defineProps({
name: String,
name: {
type: String,
default: "",
},
});
</script>
<style scoped>
</style>
|
可以看出vue3中使用了一个defineProps的宏函数,这个宏函数在vue3官方文档中也有相应的介绍,可用于接受父组件传递给子组件的props数据。
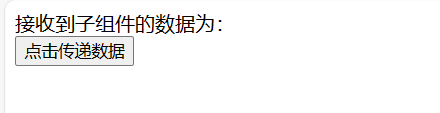
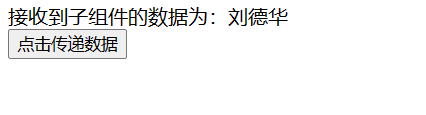
$emit
子组件向父组件传递数据同样通过$emit(自定义事件),上代码!!!
1
2
3
4
5
6
7
8
9
10
11
12
13
14
15
16
17
18
19
20
21
22
23
24
25
26
27
28
29
30
|
<template>
<div>
接收到子组件的数据为:{{name}}
<Child @name="receptionData" />
</div>
</template>
<script setup lang="ts">
import { ref } from "vue";
import Child from "./views/Child/index.vue";
const name = ref("");
const receptionData = (names: string) => {
name.value = names;
};
</script>
<template>
<div>
<button @click="sendData">点击传递数据</button>
</div>
</template>
<script setup lang="ts">
const emit = defineEmits(["name"]);
const sendData = () => {
emit("name","刘德华")
};
</script>
|

可以看出,又出现了一个新的宏函数defineEmits这可以拿到相当于vue2组件实例上的$emit,用于触发自定义事件。
ref
ref可实现父组件调用子组件的方法,传递数据实现父向子传递数据
1
2
3
4
5
6
7
8
9
10
11
12
13
14
15
16
17
18
19
20
21
22
23
24
25
26
27
28
29
30
31
32
|
<template>
<div>
<Child ref="child" />
<button @click="sendData">点击传递数据</button>
</div>
</template>
<script setup lang="ts">
import { ref } from "vue";
import Child from "./views/Child/index.vue";
const child = ref();
const sendData=()=>{
child.value.receptionData("刘德华")
}
</script>
<template>
<div></div>
</template>
<script setup lang="ts">
const receptionData = (name: string) => {
console.log("这是接收到父组件的数据", name);
};
defineExpose({
receptionData,
});
</script>
|
const child = ref();与ref="child"相同可拿到子组件实例,因为setup语法糖的缘故,父组件拿不到子组件的方法与属性,必须通过defineExpose({})编译器宏函数暴露出去,注意一下!
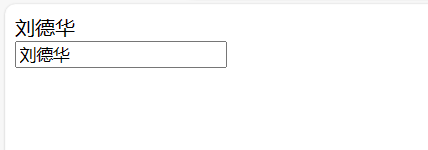
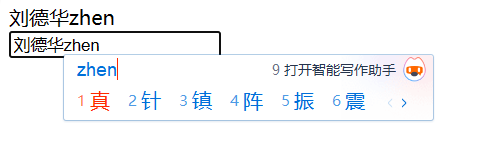
v-model
v-model与vue2类似,可实现父子组件间数据传递
1
2
3
4
5
6
7
8
9
10
11
12
13
14
15
16
17
18
19
20
21
22
23
24
25
26
27
28
29
30
31
32
33
34
35
36
37
|
<template>
<div>
{{ name }}
<Child :modelValue="name" @modelValue="modelValue" />
</div>
</template>
<script setup lang="ts">
import { ref } from "vue";
import Child from "./views/Child/index.vue";
const name = ref("刘德华");
const modelValue = (inputVal: string) => {
name.value = inputVal;
};
</script>
<template>
<div>
<input type="text" :value="modelValue" @input="changeInput" />
</div>
</template>
<script setup lang="ts">
const props = defineProps({
modelValue: {
type: String,
default: "",
}
});
const emit = defineEmits(["update:modelValue"]);
const changeInput = (e) => {
emit("modelValue", e.target.value);
};
</script>
|
vue3通过props与emit(自定义事件)实现父子组件相互传值,我通过v-model来简化代码,只需要做如下修改:
1
2
3
4
5
6
7
8
9
10
11
12
13
14
15
16
17
18
19
20
21
22
23
24
25
26
27
28
29
30
31
32
33
34
|
<template>
<div>
{{ name }}
<Child v-model="name" />
</div>
</template>
<script setup lang="ts">
import { ref } from "vue";
import Child from "./views/Child/index.vue";
const name = ref("刘德华");
</script>
<template>
<div>
<input type="text" :value="modelValue" @input="changeInput" />
</div>
</template>
<script setup lang="ts">
const props = defineProps({
modelValue: {
type: String,
default: "",
}
});
const emit = defineEmits(["update:modelValue"]);
const changeInput = (e) => {
emit("update:modelValue", e.target.value);
};
</script>
|
由以上代码看出,在父组件中省略了:modelValue="name" @modelValue="modelValue"改为v-model="name",在子组件中emit("modelValue", e.target.value);改为emit("update:modelValue", e.target.value);效果一样。
注:如果使用v-model语法糖,你的props名必须为modelValue,自定义事件名为update:modelValue
provide/inject
provide与inject在vue3中同样是实现祖先与后代组件通讯
1
2
3
4
5
6
7
8
9
10
11
12
13
14
|
<script setup>
import { provide } from "vue"
provide("name", "刘德华")
</script>
<script setup>
import { inject } from "vue"
const name = inject("name")
console.log(name)
</script>
|
mitt
Vue3 中没有了 EventBus 跨组件通信,但是现在有了一个替代的方案 mitt.js,原理还是 EventBus
下载:npm i mitt 🤥😬
npm地址:mitt
1
2
3
4
5
6
7
8
9
10
11
12
13
14
15
16
17
18
19
20
21
22
23
24
25
26
27
28
29
30
31
32
33
34
35
36
37
38
39
|
import mitt from 'mitt';
const Bus = mitt();
export default Bus;
<template>
<div>
<Child />
<button @click="sendData">点击传递数据</button>
</div>
</template>
<script setup lang="ts">
import Bus from './mitt/index'
import Child from "./views/Child/index.vue";
const sendData=()=>{
Bus.emit('sendData','刘德华')
}
</script>
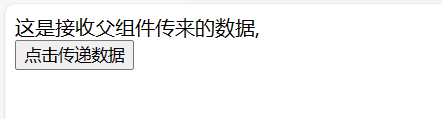
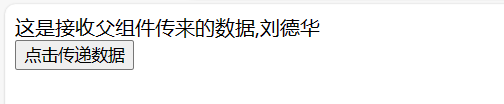
<template>
<div>
这是接收父组件传来的数据,{{ names }}
</div>
</template>
<script setup lang="ts">
import Bus from '../../mitt/index'
import {onMounted,ref} from 'vue'
const names=ref("")
onMounted(() => {
Bus.on('sendData',(name:string)=>{
names.value=name
})
})
</script>
|
mit插件的用法,可以理解成消息的订阅与发布,发布消息 Bus.emit('sendData','刘德华')订阅消息Bus.on('sendData',(name:string)=>{names.value=name})用法和全局事件总线相似。
写在最后
本文阐述了vue3的常用组件通讯,与vue2相比类似,还是希望大家先掌握vue2的组件通讯方式。如果你觉得上述有用,希望这篇文章,能帮助到你。